Setting up EFT Payments
In order to use this feature, you must first turn it on in the Setup Wizard.
Setup Tools > Setup Wizard > Suppliers and Payables > Electronic Funds Transfer
The following window will open on the right side of the Setup screen.

The first step in the setup process is to check the  check box. This turns on the feature in System Five.
The next step is to configure XML settings in XML Central
The EFT feature uses the XML file format to send information to the NOS of the National Bank of Australia. In System Five the ability to export to XML is controlled through the utility, XML Central. You must first setup the correct parameters within XML Central before moving on the EFT Setup.
Click the  button and the XML Export window pictured below will open.

In the 'Export Type' drop down, select the Check option.


In the 'Export Options' check the 'wwExportSupplier' option.

In the 'Export Filename' box, enter the file name to be used.

It is recommended that you supply the full path name to prevent ambiguity.
Next, click on the [Additional Processing] tab to continue the setup process.
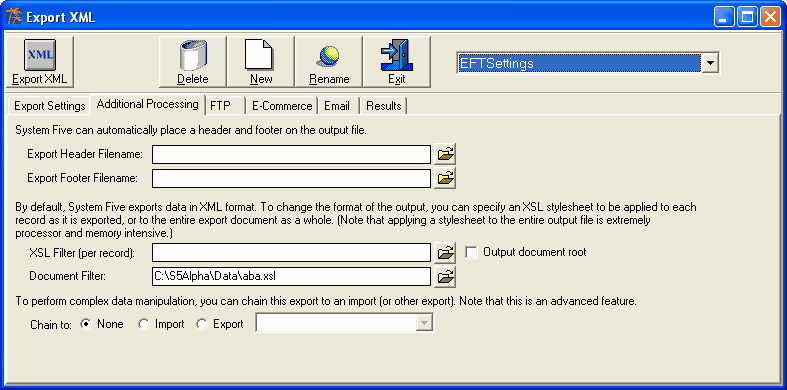
You must include the Style Sheet selection in the Document Filter in order System Five to output the data in the correct format. Again, please specify the full path to the ABA.xls file to avoid ambiguity.
On the Toolbar, click the [Rename] button

The following dialog window will open.

Type in the name you want to use for this Export Settings file. Make note of this name or use a name that you will remember as you will need to select this file in the Export Bank Setup later in the setup process.
For the purpose of this example, the name 'EFTSettings' will be used.
You have completed the XML Export Setup, click the [Exit] button on the toolbar to close the XML Central window.
The next step in the setup process is to configure the Bank Settings.
Click the  button to continue. The following window will open.

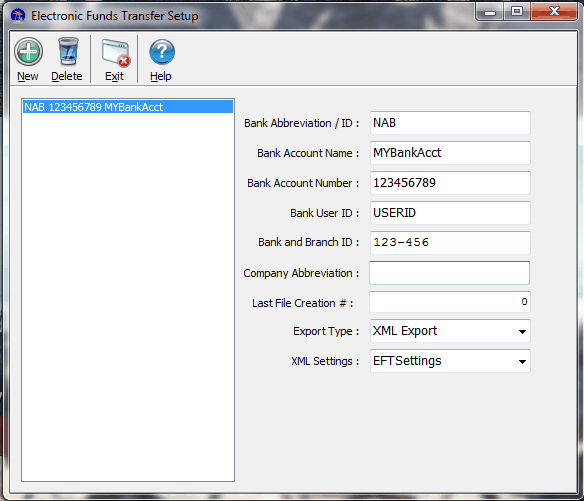
Click the [New] button on the toolbar to create a new Bank entry.
Fill in all of the following fields with the information provided by your Bank.
- Bank Abbreviation: This is a 3 letter abbreviation supplied by your bank. It is used to help the NOS to identify the bank and is also used in the name of the Settings within System Five select the correct setting file if you need to edit the settings. Please contact your bank to get the correct 3 letter code.
- Bank Account Name: This is the name assigned to the bank account, again this needs to match the name your bank has on record, please contact your bank for the correct information.
- Bank Account Number: This is your bank account number provided by your bank.
- Bank User ID: This is the User ID for access to your bank account online. Please contact your bank to ensure that you have the correct information.
- Bank and Branch ID: The is a special 7 digit value with a '-' (hyphen) in the 4th position. Please contact your bank to ensure that you have a correct information.
- Last File Creation #: This is the last File Creation Number that has been processed. The file creation number increments for every file creation.
- XML Settings: This is were you select the XML Central settings file that was created in the first step. For the purpose of the example, the name 'EFTSettings' was used.
The finished Bank Setup will look something like this:
If you want to use more than one bank for EFT, then create a bank setup for each bank account.
Once you have finished creating the required bank setups, click the [Exit] button on the toolbar to continue with the next step.
System Five requires an Asset Account to use for the processing of the Electronic Funds Transfers.
In the  box, enter the Asset Account number you want to use for this purpose. You do not need to create the account in advance, you can simply type in a new asset account number and click the
  to create the Ledger Account number you have entered.
You are now done in the Setup Wizard, click the [Close] button on the toolbar to exit the Setup Wizard.

The next step is to setup the Suppliers that you want to be able to pay via the EFT method.
From the main Navigator, select the following path:
Accounts Payable > Suppliers

The Find Supplier screen will open.

Using the Find Suppliers window, open the Supplier record you wish to setup for EFT Payments.
Select the 'Electronic Funds Transfer' tab as shown below:

You will need to obtain the information from your Supplier to fill in the values on this tab.
Repeat the Supplier setup for each of the Suppliers that you want to use with the EFT Payment method.
Processing EFT Payments
The Print Batch Checks window will open.
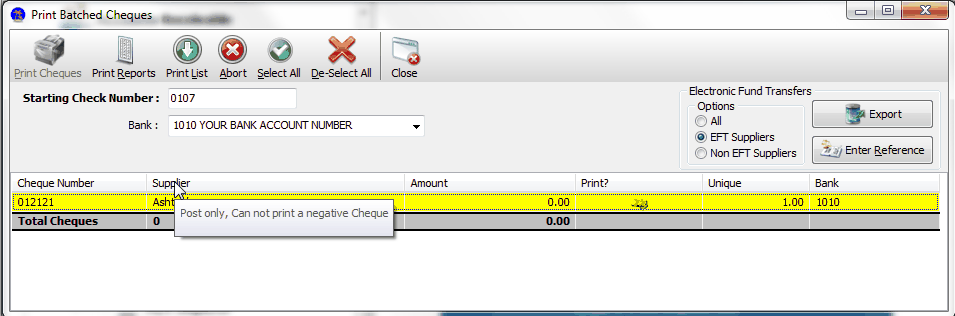
In the 'Electronic Funds Transfer' section pictured below, select the [EFT Suppliers] option to display ONLY the Supplier Payments that are configured for payment via the EFT Method.

Next, click the [Export] button on the toolbar to display the list of Bank Setups for EFT.


In this example, there is only one bank configured, so the list only contains a single entry. If you have more than one bank configured for EFT, then each will be listed here.
Select the bank you want to EFT from and the following dialog will be displayed.

The Date will default to the current date, but you can change the date as you like.
Fill in the Description with a value that you understand.
The file name defaults to the name specified in the XML Central setup. You can change the file name in order to keep copies of the previous files if you with, or you can allow the system to overwrite the file each time.
Click the  button to select a folder to save the export file in. By creating a folder structure, you can allow the file name to remain the same and still have copies of the previous exports.
Click the  button to continue or the
  button to abort the process.
Click the [Close] button to continue.

Reference Number Input

System Five will display the dialog above.
Sending Payments to the Bank
Open Online Bank and log onto the software.
From the menu bar, click on Funds Transfer, then Direct Payments, Import, File Import.
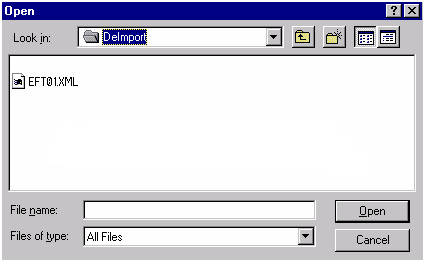
Locate the EFT01.XML file that System Five generated, by clicking on the drop down arrow and locating the directory that has the file. Once located, click on the EFT01.XML file and click "open"
If there were errors on the file, you may get a printable error report. (below)

In this example the errors reported did not fail the import & Online Bank has corrected as much as it can. Take a note of any errors as they will need to be corrected in System Five so you won't get this message again next time. Also note any error references to BSB / account numbers as National Online is not able to validate actual numbers.
If the file has fatal errors the import will fail & the report will advise. The most common reason for a file to fail, is your UserID, has not been set up in System Five, or the Account you want to make the payment from does not match with what is registered in the Online Software. Make the corrections in System Five & import again.
When imported the screen will look like picture below. Note the Amount of the file, Value Date (day file is to be credited to your account), & supplier accounts that will be debited.

Click on Save

Click on Authorize

Key in your password - click ok
An authorization confirmation screen will appear noting that message has been fully authorized. - click close
Click on Connect

Online will then dial the bank & transmit the file. When connection is completed, you can view the register to see the status of the file.
To view the register:
Click on Funds Transfer > Direct Payments > Register

The Status column shows at what state the file or message is at. After connection to the bank the status should show "Sent". A message with any other status has NOT been transmitted to the bank. A file can only be sent to the bank when it has been authorized and you have successfully dialed the bank.
If you then wait for about 30 minutes and connect to the bank again, the status should then be updated to show a confirmation of "Bank Received".
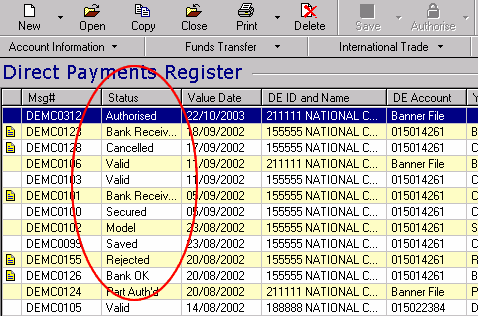
The Msg# column above contains the Reference Number that you need to type into the dialog box waiting in System Five.
SUPPLIER REMITTANCE
Open a supplier account, go to Electronic Funds Transfer tab and complete the banking information.

Go Supplier Remittance Forms Tab and input the email address(s) that you want the remittance forms to go to for that supplier.

The only other part of the setup remaining is to create a default Email (or you can do this for each check run). This is done from the Print Batched Check area.
In Print Batched Check Area - EFT Email Settings the screen below will appear. You can complete the wording for the email subject line and the body of the email. If you want to change this every time you do a check run then DO NOT Save as Default. If you want to have a very generic email like the one below then once you have completed inputting the wording press Save as Default.

Also, XML export doesn't need to be a setup. All that needs to be done is.
1) Check the “Use EFT” check box in the Setup Wizard.
2) Click “Bank Settings”.
3) Click “New”.
4) Enter their banking information.
5) Select “CPA 005” as the Export Type.
6) Close the EFT Setup window.
7) Create an EFT Clearing Account in the Chart of Accounts.
8) Enter the previously created ledger number in the “EFT Clearing Account” box in the Setup
Wizard.
After that, the processing of EFT payments should be the same as documented. Currently, only CPA 005 format is supported. If your bank is expecting a different format, then it will be custom programming.


